|
Parkland
College > Fine & Applied
Arts > Graphic
Design | Web Design
>
GDS 214 WEB DESIGN II
|
|
|
|
ActionScript for Designers Slide into your pages
|
|
|
|
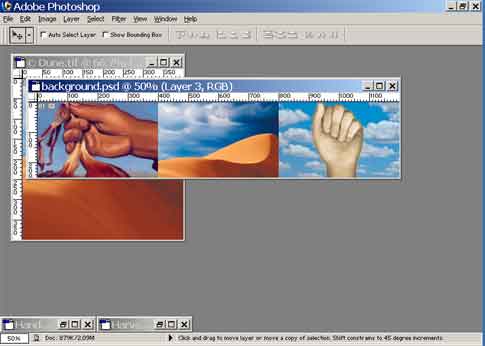
Slding into a new page with intetia is a popular way to exhibit your content in Flash. This lesson shows you haw simple this effective technique can be. Step 1 - Get your background image ready In PhotoShop... Make an image in photoshop for your background for your flash page. We are going to do three panels so we will need 3 images (one for each panel). I grabbed three pictures from the PhotoShop Samples folder. If there are layer in the picture, you will probably need to flatten them in order to copy them into your document. Make an image in photoshop that is 1200 px wide by 250 px tall. Resize the three images that you will use as your panel images to 400 px wide. Copy and paste each image into the 1200 px wide image spacing them so they form a panel of three pictures in a row. Save your image for the web.
In Flash... Create a new document 400 px wide and 250 px tall.
Rename the layer to panel. Import your graphic into this layer. Use the info panel to center your image,
set the x at 400 and the y to 0.0 Be sure that the registration is set in the upper left position. Select the image and press F8 to turn it into a movie clip. Name your movie clip: panel or Insert > Convert to symbol Name the instance "panel" Also in the property inspector,
Create a new layer above your panel layer and call it: script Be sure that nothing else is selected. Create a new movie clip (Ctrl F8) and call it: script A new timeline should open. Add keyframes at frame 5 and also at frame 6. name that layer: script Click on frame 1 of the script layer and name it "stop" in the property inspector. Click on frame 5 in the script layer and name it "move". Click on frame 1 of the script layer and open the actions panel. Be sure you are in expert mode. Add a stop() baseRate=1.6; so your script should look like.
Click in frame 5 of the script layer and add the following script in the actions window in expert mode: difference = _root.targetx - _root.panel._x; Change the mode to Normal
In frame 6 of the script layer in the actions window and add
the following code: gotoAndPlay("move");
That's all for the script movie. Save your work. Add the script to your movie... Back in the main stage, open the library panel if it's not already open then drag an instance of the script movie clip into the script layer and name the instance: script
Now we need to make the buttons...
Draw a rectangle on the screen and then turn it into a button symbol. Insert > convert to symbol be sure to select the "button" behavior. Name it: button With the button selected go the the actions panel and add the following code: on (release) { Note: It is easier if you type this code in in the expert mode.
Back on the main stage, copy and paste two more copies of the button on your stage on the button layer. Name the instance of your first button: button 1, the second: button 2 and the third button 3 Use the align panel to arrange your buttons evenly. Hint: uncheck the stage button so the buttons will align among themselves and not to the stage,
targetx = -400.00;
Click on button 3 and then change the actions to: targetx = -800.0; So your code now reads: on (release) {
Save and Control > Test Movie or Ctrl + Enter See the project: Add a mask to add a shape. Add a layer above the panel layer and name it mask. Click on the little symbol next to the name in the layer click on "masked.
Click on the little symbol next to the name in the panel layer Click on "masked"
In the mask layer use the rounded rectangle to draw a black shape. This is the portion that will be revealed in the final swf.
Publish your Masterpiece File > Publish Settings (Ctrl + Shift + F12) Use these settings to publish your html page: Dimensions: 100% Scale: No Border
See the masked version: slide_masked.html |


|
|
|
files:
|
|
|
|
|
|
______________________________ Last updated: 8/26/03 Webmaster: Paul Young |