| Parkland
College > Fine & Applied Arts
> Graphic
Design | Web Design
>
GDS 214 WEB DESIGN II
|
|
|
|
Interface Design in PhotoShop 7 |
| |
|
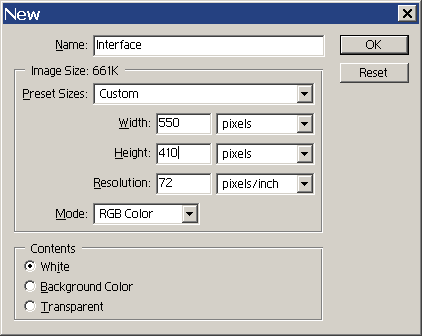
Step 1 - Setting up your GuidesOpen a new document Name your document Interface. Set the width for 550 and the height to 410. Make sure the Resolution is set at 72 pixels/inch and the Mode to RGB. In the contents section, be sure the color is set to White.
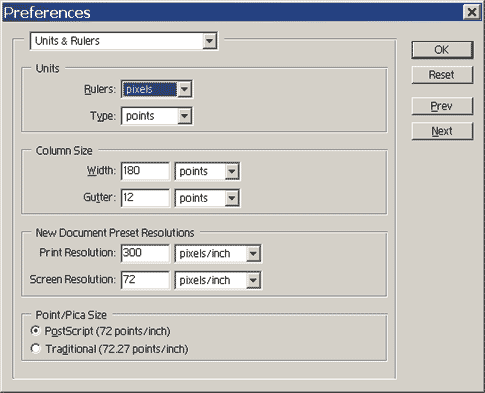
View > Rulers (Ctrl + R) to view rulers. Double click inside one of the rulers to display the Units & Rulers Preferences Dialog Box. Set the units to pixels if they are not already set. Click OK.
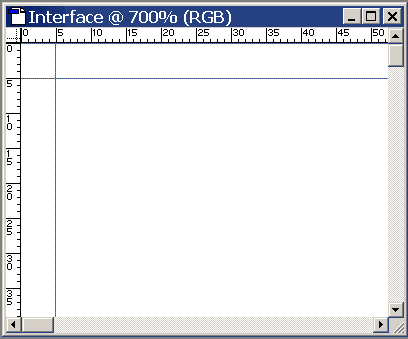
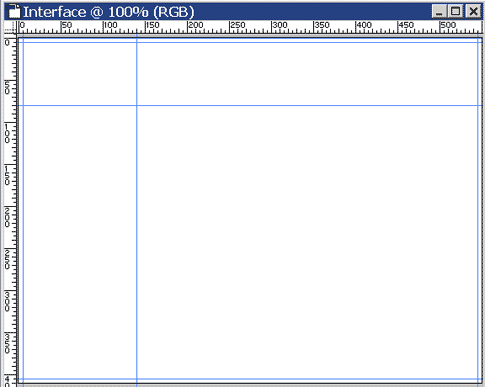
Zoom in 700% Hold the spacebar to toggle the hand to move to the upper left hand side of the image or use the scrollbars to so you can view the 0,0 points of your document. Select the Move Tool (V). Click inside the horizontal ruler and drag out a vertical guide at the 5 pixel mark on your ruler. Then do the same thing for a horizontal guide by dragging inside the vertical ruler so you have a horizontal guide at 5.
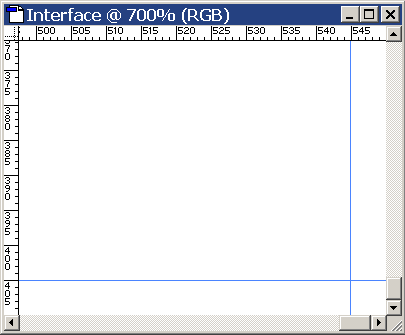
Do the same thing for the bottom left corner by viewing the 550, 410 by either the scrollbars or holding down the spacebar and dragging with the hand. Add a vertical guide at 445 and a horizontal guide at 405.
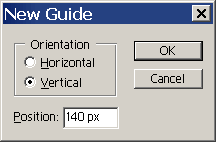
Zoom back to 100% (Ctrl + -) View > New Guide Set the orientation to vertical and type in 140 px for the position. Click OK.
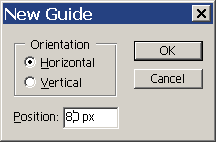
Again... Set the orientation to horizontal and type in 80 px for the position. Click OK.
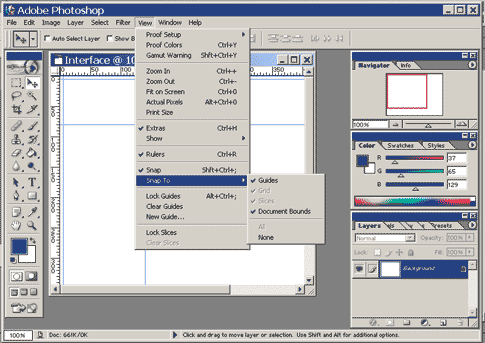
View > Snap Be sure that your guides are set to Snap.
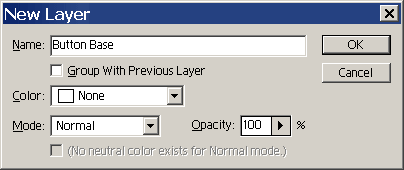
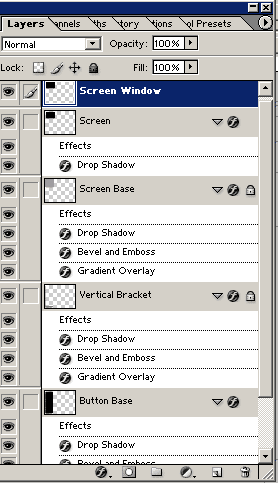
File > Save As (Ctrl + s) Save your file as interface.psd Step 2 - Creating the Button BasePress D for the default colors (Black and White). Black should be the foreground color. Create a new layer (alt + click on Create New Layer Icon at bottom of Layers Window or Layer > New > Layer Name your layer Button Base and Click OK.
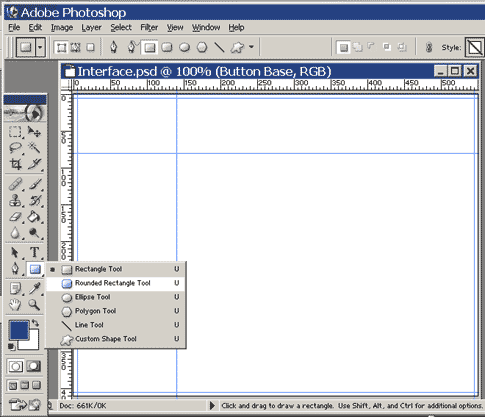
Choose the rounded rectangle tool from the toolbox (or press Shift + U until the rounded rectangle is selected.
On the options bar choose the fill pixels icon and type in 20 in the redius box.
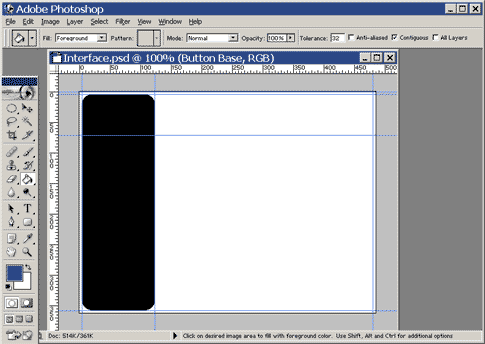
Draw a rounded rectangle between the verticle guides at 5 and 150 pixels down to the horizontal guides at 5 and 405.
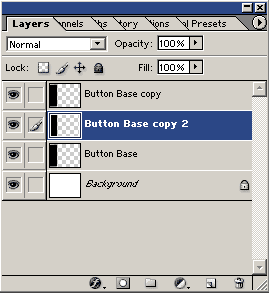
In the Layers Window, drag the Button Base to the Create New Layer Icon at the bottom of the layers pallette. Repeat (make sue you have two new copies of the Button Base Layer.
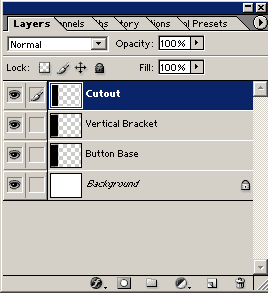
Rename the layer above Button Base to Vertical Bracket and rename the top layer to Cutout.
Click on the Vertical Bracket Layerto select it and the click the Lock Transparent Pixels Option to turn it on (/).
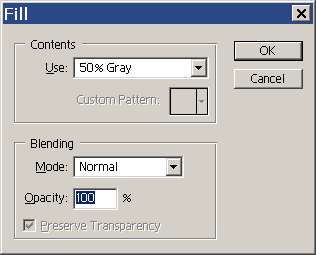
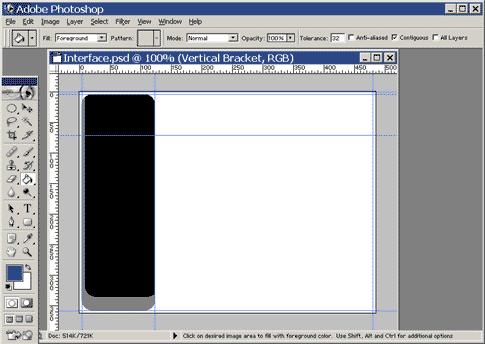
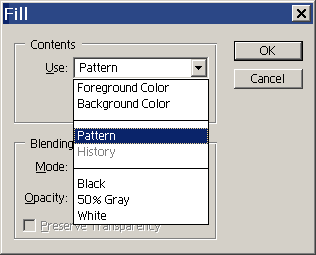
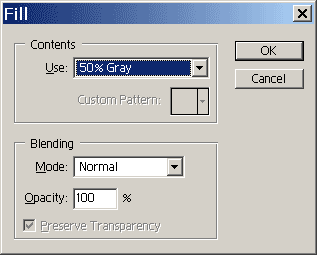
Edit > Fill Select 50% Gray from the Use pop up menu under Contents. Click OK.
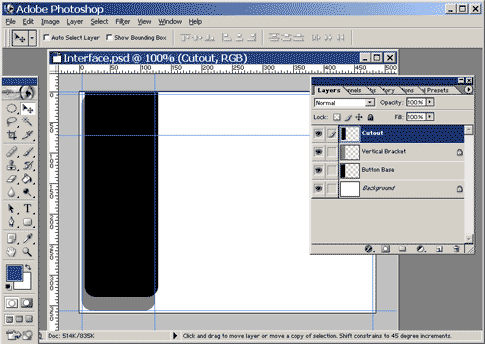
Don't woory if there seems to be no change. The Cutout Layer is blocking our view. Click on the Cutout Layer to make it active. Select the move tool (V). Hold down the Shift key and hit the up arrow on your keyboard two times (10 pixels). Release the Shift and press the up arrow two more times (2 pixels). Press the right arrow 5 times to move the Cutout Layer 5 pixels to the right.
Hold down the Control Key and click on the Cutout Layer. This loades the rounded rectangle shape on the Cutout Layer as a selection. Click the Vertical Bracket Layer to make this the active layer and press the delete key (backspace). Press Ctrl + D to deselect. Delete the Cutout Layer by dragging it to the trash can at the bottom of the Layers Pallete.
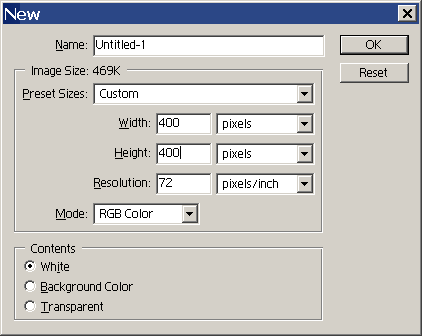
Save your work. Step 3 - Adding the Background TextureOpen a new Document (Ctrl + N). You don't have to name it since this is a tempory document and we will be deleting it without saving it. Set the height and width to 400 pixels and se the resolution to 72 pixels per inch. Leave the Contents white and be sure it's set the the RGB Mode. Click OK.
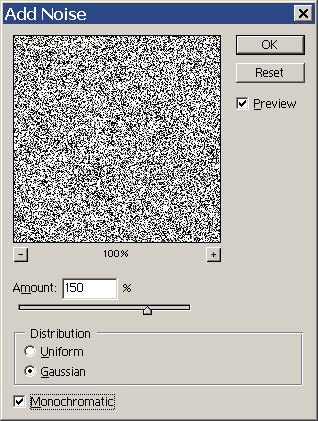
Filter > Noise > Add Noise Change the Amount in the Add Noise Box to 150, set the Distribution to Gaussian and turn on the Monocromatic option. Click OK.
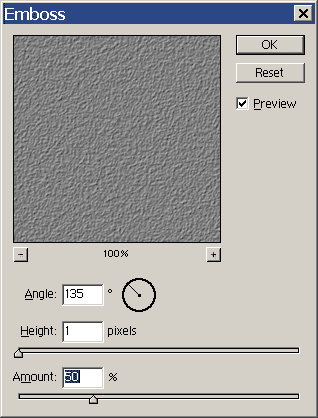
Filter > Blur > Blur Filter > Stylise > Emboss Set the Angle to 135 degrees, Height to 1, and Amount to 50%.
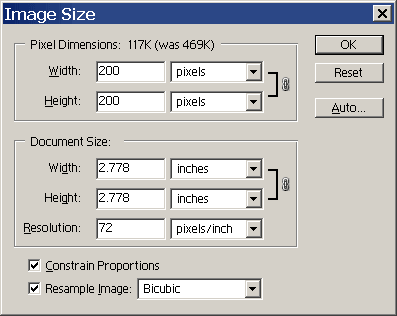
Image > Image Size (or Right Click or Ctrl Click on Mac on title bar and select Image Size) Change the Height and Width to 200 pixels for both.
Select > All ( Ctrl+ A) Edit > Define Pattern Change Name to Interface Background in the Pattern Name Box. Click OK.
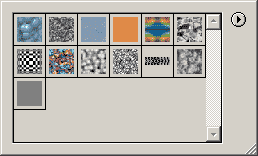
Close your temporary document without saving the changes. In Interface.pds, click on the Background Layer to select it. Edit > Fill Select Pattern from the Use pulldown menu and select your Interface Background. Click OK.
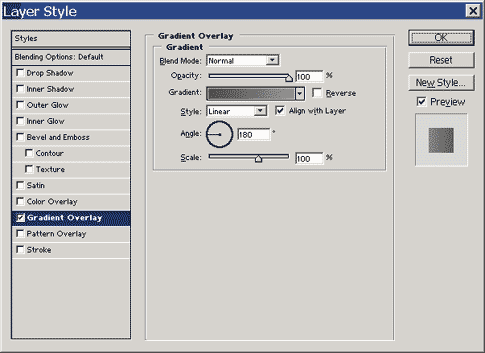
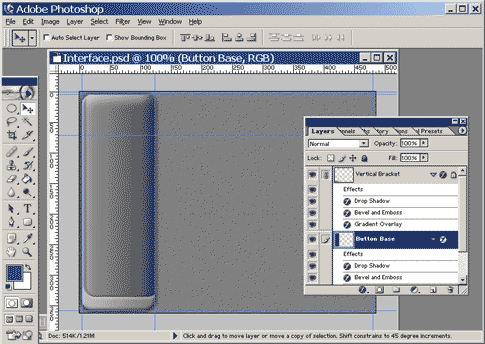
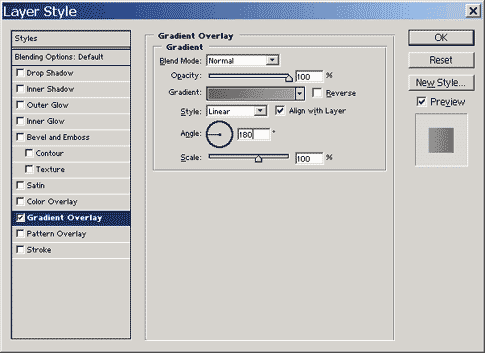
Save your work. Step 3 - Adding Color and DepthClick on the Button Base Layer to make it active. Double Click to th right of the name on the Base Button Layer to open the Layer Style Dialog Box. Click on Gradiant Overlay. Note: Be sure to click on the name and not just check the checkmark to select it.
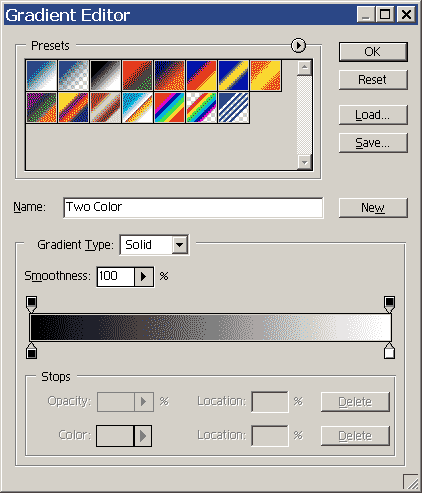
Click on the gradient preview below the Opacity Slider to open the Gradient Editor.
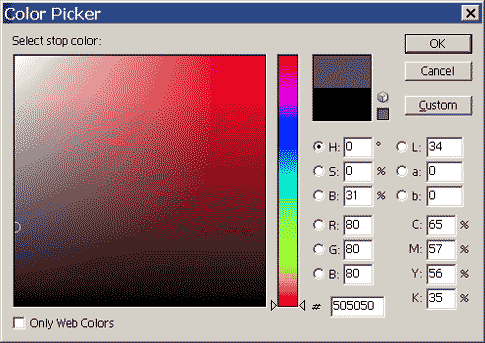
Click the lower left color stop and change the color to R:80, G:80 and B:80.
Click on the lower right color stop and change the color to R:145, G:145, and B:145. Click OK Click OK again to exit the Gradient Editor. Still in the Layer Style Dialog Box, change the Angle to 180 degrees and leave everything else at the default. Click OK.
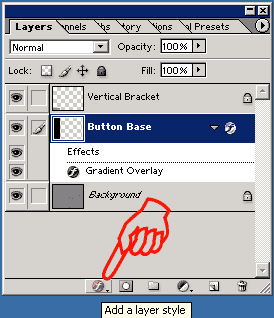
Click on the Layer Style Button at the bottom of the Layers Inspector to reopen the Layer Styles Window (looks like an F).
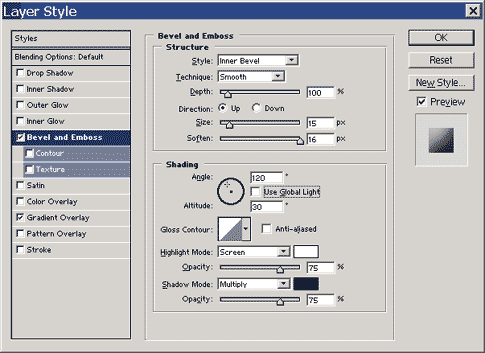
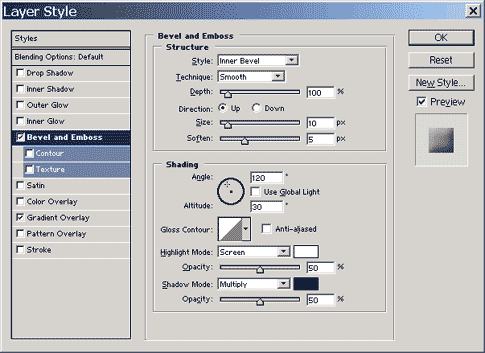
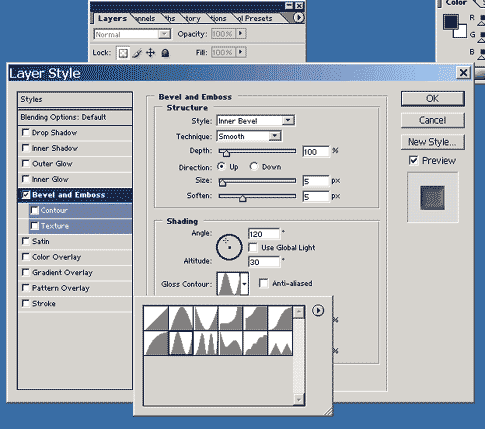
Click on Bevel and Emboss Set Style to Inner Bevel and Technique to Smooth. Leave the Depth at 100% and set the Direction to Up. Enter 15 px for Size, 16 px for Soften, 120 degrees for Angle, 30 degrees for Altitude and turn off the Use Global Light option. Leave the rest of the settings the same. Leave the Layers Style Window open.
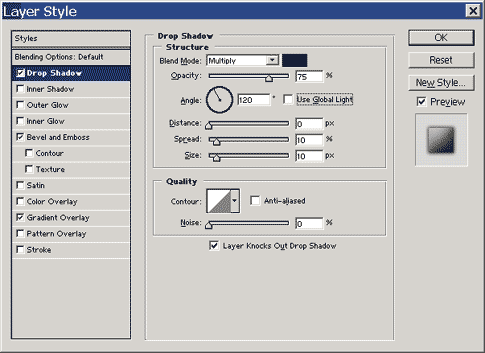
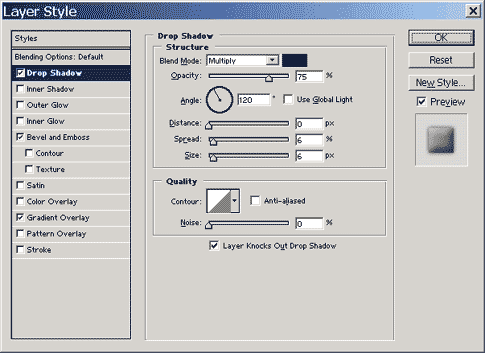
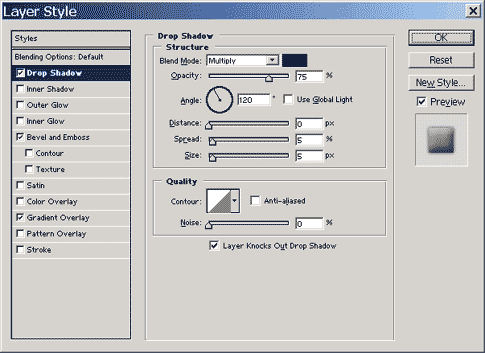
Click on Drop Shadow Style. Change the Distance to 0, Spread to 10, and Size to 10. Turn off Global Light Setting and use the default fo all other settings.
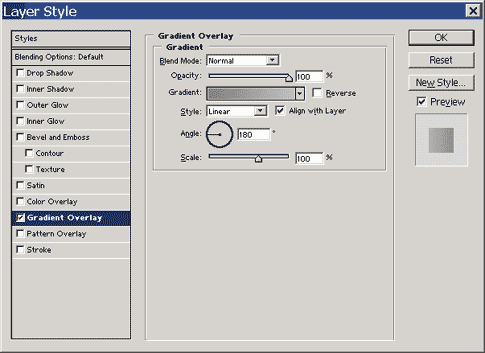
Click OK. Double Click on the Vertical Bracket Layer title to open the Layers Style Box. Click Gradiant Overlay and open the Gradient Editor. Click on the lower left color stop and click on the color swatch to open the color picker. Use R:128, G:128, and B:128. Click OK. Click on the lower right color stop and click on the color swatch to open the color picker. Use R:190, G:190, and B:190. Click OK. Click OK again to exit the Gradient Editor. Change the Angle to 180.
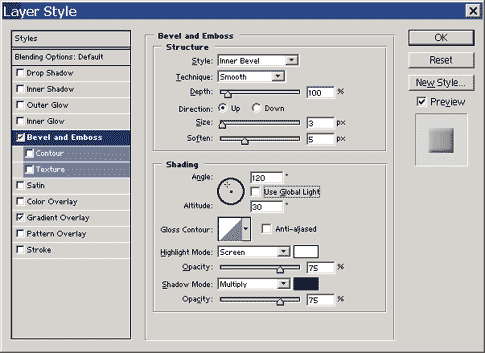
Select Bevel and Emboss Change the Size to 3, Soften to 5px and turn off the global lighting function. Leave everything else at the default.
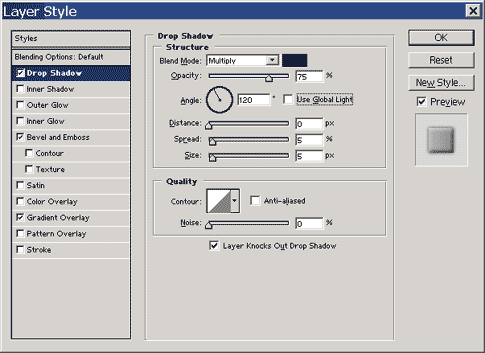
Click on the Drop Shadow Option. Turn off Global Light, set Distance to 0 px, Spread to 5%, and Size to 5 px. Leave all the other setting at their default settings.
Save Your work. Step 5 - Creating the Screen.Click the Button Base Layer then click on the square to the left of the Button Base Layer.
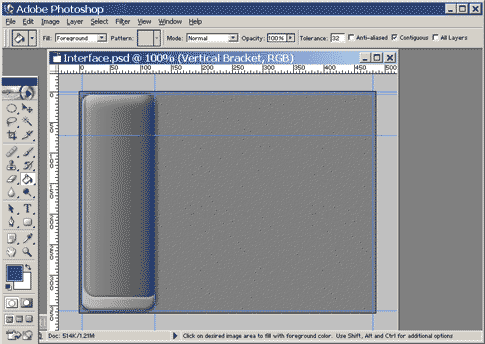
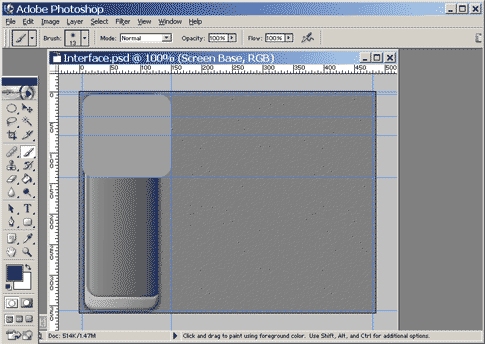
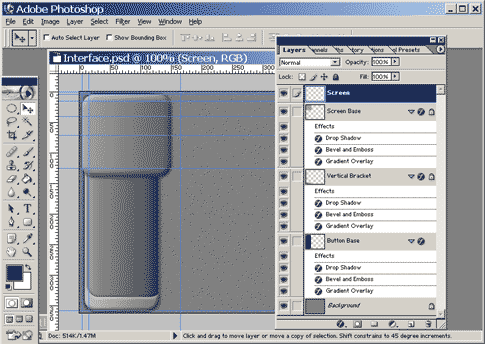
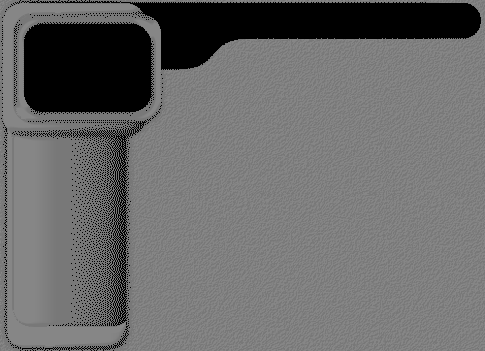
With the Move tool selected, press the right arrow key 5 times to move both layers over 5 pixels. Unlink the Vertical Bracket Layer from the Base Button Layer. Drag the Verticle Guide at 140 pixels onto the verticle ruler to remove it. Go to the View menu and choose New Guide. In the New Guide dialog box, set the Orientation to Vertical and the position to 150 px and click OK. Go to View, New Guide again and set the Orientation to Horizontal, position to 140 px; then click OK. Go to View, New Guide once more and set the Orientation to Horizontal, position to 40 px, and click OK. You won't use this last guide for a while, but you might as well set it now while you're setting the others. Click the foreground color swatch from the toolbox to open the color picker. Change the color to R: 160, G: 160, B: 160. Click OK. Click the Vertical Bracket layer to make this the active layer and Alt(Opt)+click the Create a new layer icon at the bottom of the Layers palette. Name the new layer Screen Base and click OK. Select the Rounded Rectangle tool again. The Fill pixels icon on the Options bar should still be selected and the radius should still be set to 20 px. Draw a rounded rectangle between the vertical guide at 5 and 150 px and between the horizontal guides at 5 and 140 px.
Press the slash (/) key to toggle the Lock transparent pixels option on for the Screen Base layer. Press D for the default colors of black and white. Double dick to the right of the Screen Base title to open the
Layer Style dialog box. Click the Gradient Overlay option under
Styles. Click the gradient preview to open the Gradient Editor.
Click the lower left Color Stop (below the gradient bar), and
then click the color swatch to open the color picker. Change
the color to R:100, G:100 B:100. Click OK. Click the lower right
Color Stop and then change the color to R:160, G:160, and B:160.
Click OK. Click OK to exit the gradient editor. Change the angle to 180
degrees and leave all other settings at the defaults.
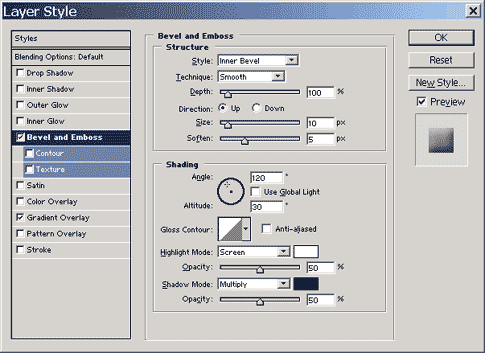
Click on the Bevel and Emboss Style. Change the Size to 10 px, Soften to 5 px, turn off Global Lightm set the opacity for the Highlight Mode and Shadow Mode to 50% then leave all other settings at the default settings.
Click the Drop Shadow Style title. Turn of Global Light, set the Distance at 0, Spread at 6%, size at 6px and the keave everything else. Click OK
Press V or select the Move Tool. Drag the verticle guide at 150 and the horizontal guide at 140 off the stage to remove them. View > New Guide Add tow verticle guides at 15 and 165 pixels. Add two horizontal guides at 15 and 125 pixels. Click on Screen Base Layer and then Alt click on the make a new layer button on the bottom of the layers manager. Name the new Layer Screen.
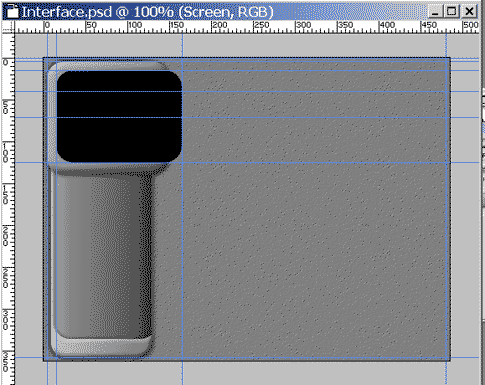
Select the Rounded Rectangle tool and draw a rectangle from the verticle guides at 15 and 165 to the horizontal guiges at 15 and 125.
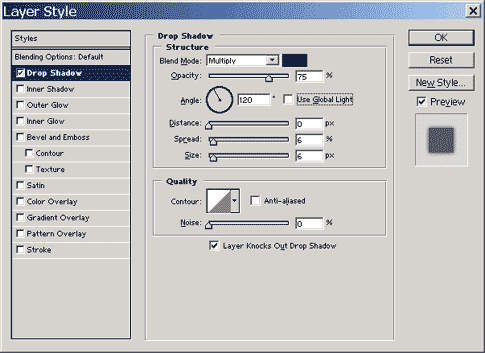
Double Click on the right of the title in the Screen layer to open the layer styles box. Select Drop Shadow Style and then turn off global light, set distance at 0, Spread at 6% and Size at 6 px and leave the remaining options at thrie default settings.
Save your work. Step 6 - Creating the Screen Window.Drag the Screen Layer to the bottom of the layer pallette to breat a duplicate layer. Double click on the name and change it to Screen Window. Drag the drop shadow layer style from below the layer inot the trash to delete it.
Click on the lock transparent pixels button or tyoe / for the Screen Layer. Edit > Fill Select 50% Gray from the drop down menu.
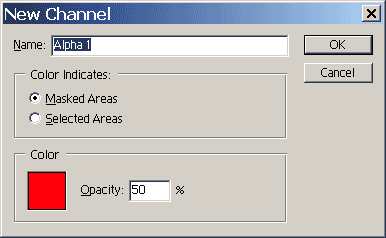
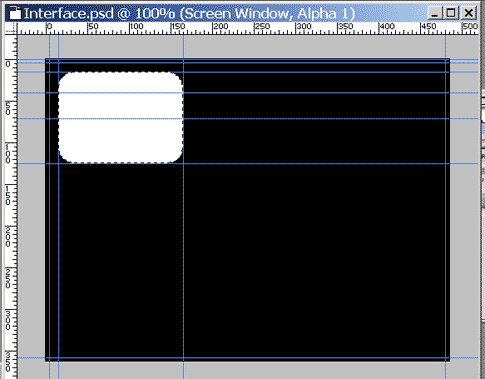
Control Click on the Screen Window Layer to load the contents as a selection. Click on the channels tab ro Alt click the make new channel button at the bottom. Make sure that Masked Areans is selected in the color indicates section of the box.
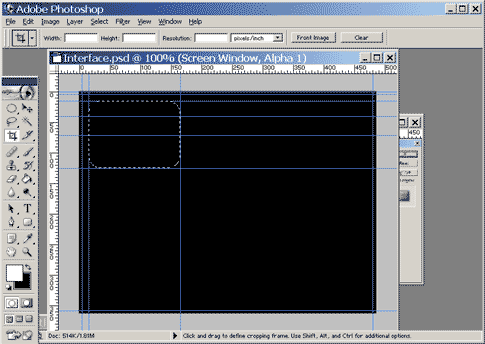
You should now have a new chnnel titled Alpha 1 that is filed with black. White should be your current background color.
Pres Alt - Delete (Backspace) to fill the selection with a white color.
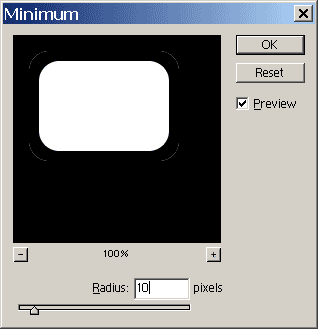
Press Control D to deselect. Filter > Other > Minimum Change the radius to 10 pixels.
Click OK.
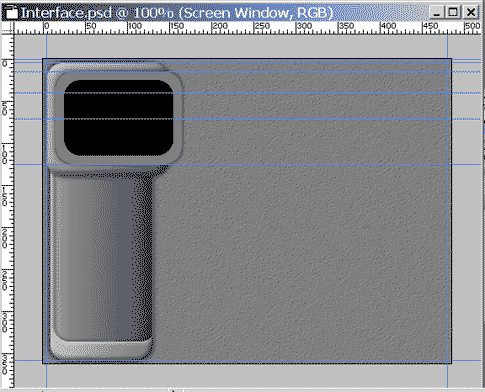
Go back to the Layers pallette and select the Screen Window Layer Press CTRL + Alt + 4 to load the alpha channel as a selection. Press Delete Press Ctrl + D to deselect. Select the Move tool and remove the horizontal guides at 15 and 125 and the verticle guides at 15 and 165 pixels..
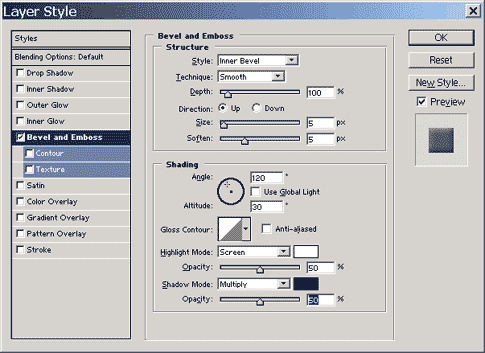
Double Click on the Screen Window Layer to open up the Layer Style Dialog Box. Select Bevel and Emboss Style. Only change the Size to 5px and the Soften to 5 px. Turn of global light and set the Highlight Mode and Shadow Mode to 50% for both.
Below the Altitude setting is a Gloss Contour thumbnail to open the contour picker. Select Ring Contour (at the bottom row second for the left.
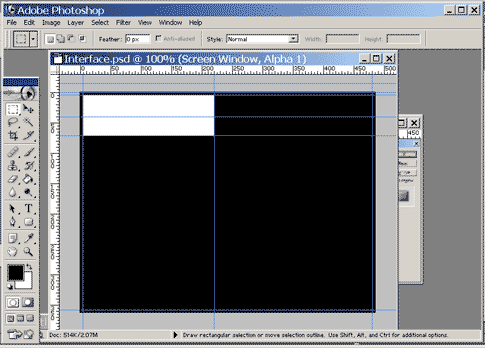
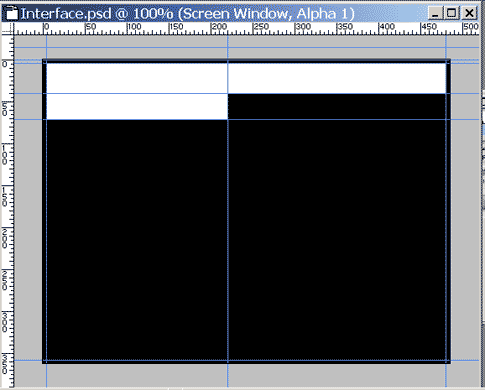
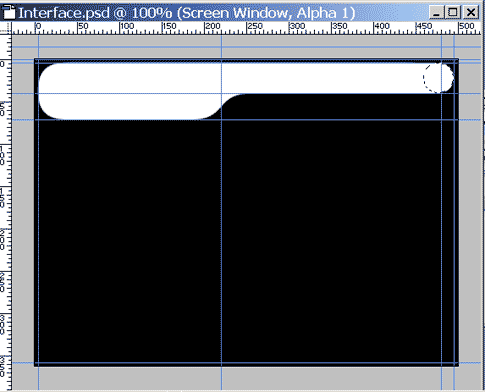
Click OK. Save your work. Step 7 - The horizontal ComponentClick on the channels tab to view the channels pallette. Click on the Alpha 1 channel and delete it by Alt + Delete (backspace) to fill it with the black forground bolor. View > New Guide Put in a new verticle guide at 220 pixels. Draw a rectangle selection between the verticle guides at 2 and 220 pixels and the horizontal guides at 5 and 80 pixels. Pres Control + Delete (backspace) to fill with the white background color. Press Ctrl + D to deselect.
With the rectangle Marquee tool still selected draw a rectangle form the selection between the verticle guides at 5 and 545 pixels and the horizontal guides at 5 and 40 pixels. Press Ctrl + Delete (backspace) to fill with the white background color.
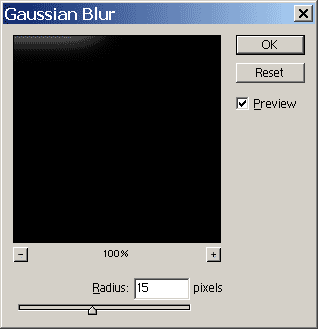
Filter > Blur > Gausian Blur Set the radius to 15 pixels and click OK.
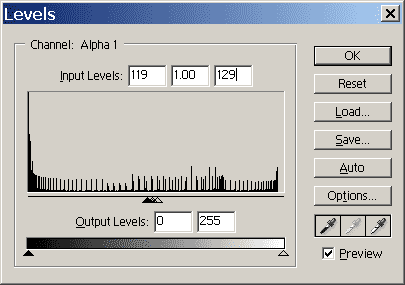
Press Ctrl - L to open levels. Enter 119 in the far left input levels and 129 in the far right input levels field.
Click OK. View > New Guide Set a verticle guide at 528. Draw a rectangle selection between the verticle guides at 229 and 528 and the horizontal guides at 5 and 40. Press Ctrl + delete (backspace ti fill with white color. Press Ctrl D to deselect. Select the elliptical Marquee tool Zoom in on the upper right hand corner. Hold down the shift key and draw a circle that covers the end of you rectangle.
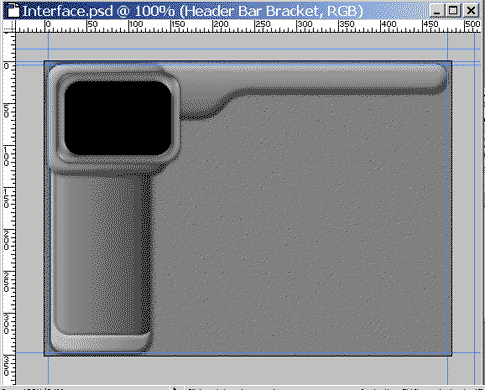
Press ctrl + delete (backspace). Press Ctrl D to deselect. Zoom back to normal level. Click on the Layers tab to return to the layers pallette. Click on the verticle Bracket Layer and make it active. Create a new layer called Header Bar. Press Ctrl + Alt + 4 to load the alpha channel as a selection. Press Alt + Delete to fill with black. Press Ctrl D to deselect. Drag your verticle guide at 528 off the document.
Save changes. Step 8 - finishing the Header BarDouble Click right of the title on Header Bar to open the layer style box. Click on the Gradiant Overlay under styles. Click on the lower left color stop and change the color to R:100, G:100, and B:100. Click on the lower right color stop and change the color to R:160, G:160, and B:160. Click OK. Click OK again to exit the Gradient Editor. Select the Bevel and Emboss Style in the Layer Style Pannel. Change the Size to 10 px, Soften to 5 px and turn off global light. Set the Opacoty for Highlight and Shadow Mode to 50%. Leave everything else at the default settings.
Select the Drop Shadow Style. Turn off the global light option, set the distance to 0px, Spread to 5 px and leave everything else at the default.
With the Header Bar layer still active, Alt(opt) + click the create new layer icon at the bottom of the layers pallette. Name the New layer Header Bar Bracket. Ctrl Click the Header Br to load it's contents as a selection. Edit > Stroke In Stroke dialog box set the width to 5 px, leave the color black, set the location as inside and leave the rest at the default settings. Click OK. Press Ctrl D to deselect. With the move tool drag the verticle guide at 220 and the horizontal guides at 40 and 80 off the document.
|
|
______________________________ Last updated: 8/26/03• Webmaster: Paul Young |
