|
Parkland
College > Fine & Applied
Arts > Graphic
Design | Web Design
>
GDS 214 WEB DESIGN II
|
|
|
|
Modifying Your Interface for Frames |
|
|
|
In this exercise, we will take the Interface we made in the last lesson and modify it for frames. If you don't have you copy from Interface Design, download it here in PhotoShop format (psd) interface.psd or interface.zip. |
|
|
|
Modifications to interface.psd I decided that there needed to be a few changes that needed to be made to interface_final.psd before it would be optimal for frames and portray my message. Resize Your Image We want to make the image a little larger. Change the width to 580. This will make it as wide as possible for visitors using 600 resolution browsers. For now use check constrained so the height should be modified to approximately 432. After we resize the elements next, we will decrease the width to 340 for Windows users at 600 resolution. For now though, just change the width to 580. Image > Image Size
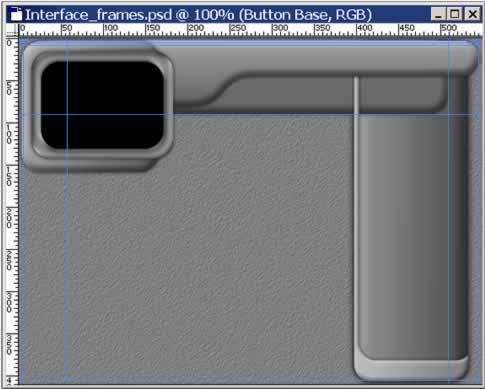
I decided that I wanted to move my button bar to the right side of the page so I selected the Button Base layer then clicked on the little square to the left of the title and to the right of the eye in the Vertical Bracket layer.
This temporarily groups the layers together so I can move the. Hold down the shift key and click the right arrow until your menu lines up with the left edge of your document (approximately 39 times).
Now you will notice that the Vertical Bracket Layer is above the Header Bar Bracket Layer thus is is showing through. Next drag the Vertical Bracket Layer under the Header Bar Bracket Layer in the Layers palette.
Add a horizontal guide at 349 px. View > New Guide
Next We want to make the screen larger so we want to lock the layers together the same way we just did with the button bar. Click on the Screen Base Layer and then click in the little box to lock the Screen and Screen Window layers.
Now we want to make the Screen larger Select the Screen Layer (with the two complementary layers locked). Edit > Free Transform Hold down the shift key(to constrain the shape) then drag the screen down to just above the horizontal guide at 340. You can fine tune it with the arrow key. Click Apply the transform in the box that pops up.
Now we want to do the same thing with the button bar. Select the Bottom Bar layer and be sure that you have the Vertical Bracket layer locked to it.
Edit > Free Transform Drag the bottom of the button bar layer to just above the horizontal guide at 340.
Click on Apply the Transform.
Now we need to change the orientation of our gradient on the Screen Base layer so when we tile the graphic in our frames later it will tile correctly. Select the Screen Base layer. If the little arrow isn't open do you can see the effects on that layer, open it and double click on the Gradient Overlay section.
Change the angle to 90%. Click ok.
Now we want to move the corner of the button base over to the left so we can easier slice and dice our image in the next section. Select the Screen Base layer and unlock the Screen and and the Screen Window Layers.
Edit > Free Transform Drag the right edge over a little bit so it doesn't interfere with the slicing we will do in a minute to approximately 380.
Crop your document to approximately 340 px height. Select the crop tool in the toolbar. 
Drag a rectangle around your image. Cut off the bottom gray section to just under the horizontal guide at 340. Position your crop carefully to be sure that you are at the exact edge for the top, right and left before you select enter to complete the crop.
Save your work (Ctrl + S) We now have all of the graphic changes made. Here us the completed copy: interface_frames.psd or interface_frames.zip Next we will slice and dice the image in order to fill our frames for our web site.
|

|
|
|
|
|
______________________________ Last updated: 8/26/03 Webmaster: Paul Young |